
RenterGlow is reader-supported. When you purchase through links on our site, we may earn an affiliate commission at no extra cost to you. As an Amazon Associate, we earn from qualifying purchases. All recommendations are based on technical hardware specifications and independent editorial review. Learn more in our disclaimer and disclosure.
Quick Assessment: Peel and Stick Floor Tiles Over Rental Linoleum
Installing peel and stick floor tiles over rental linoleum can be accomplished reliably by establishing a sacrificial underlayment barrier using high-quality blue painter tape. Direct adhesive installation over aged linoleum carries measurable risks of adhesive transfer and surface tearing upon move-out. Laying edge-to-edge painter tape isolates the aggressive vinyl tile adhesive from the sheet flooring. Successful, low-residue removal depends on subfloor integrity, controlled thermal softening with a household hair dryer during move-out, and thorough residue cleanup using isopropyl alcohol.
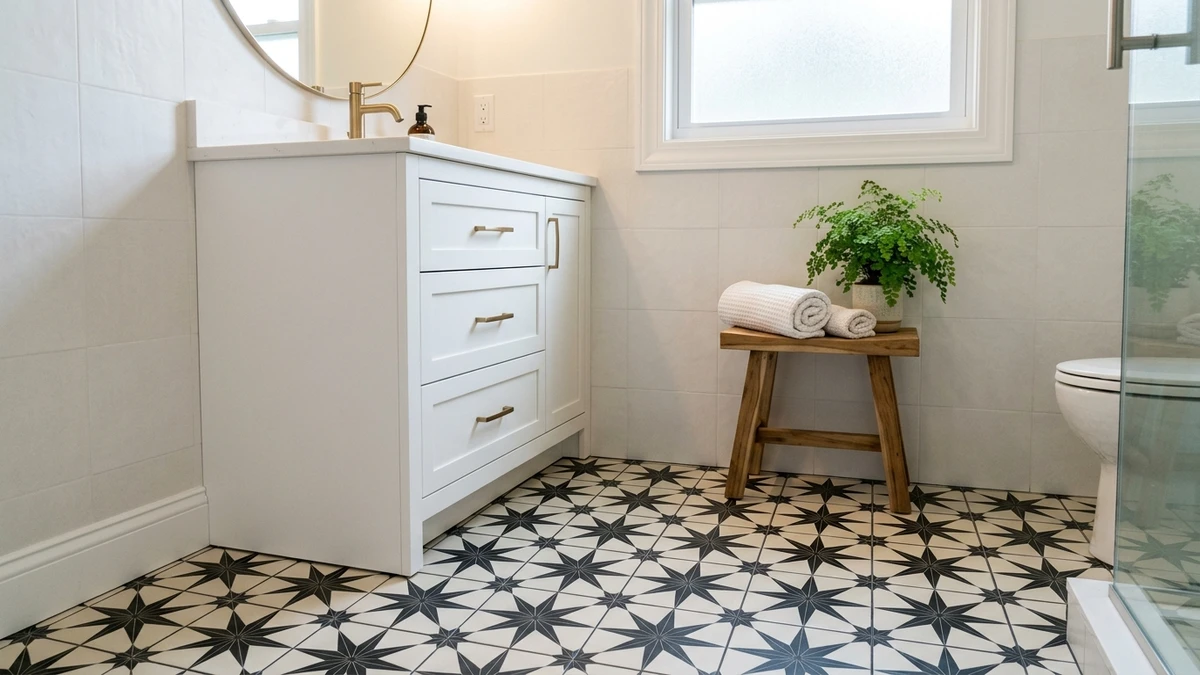
Dated, yellowing sheet linoleum and scuffed builder-grade vinyl flooring remain two of the most stubborn visual eyesores in rental apartments. Because lease agreements strictly prohibit structural floor replacement or permanent alteration, tenants often feel trapped with discolored patterns and worn surfaces. Fortunately, installing peel and stick floor tiles over rental linoleum offers an accessible, removable alternative to elevate rental kitchens, bathrooms, and entryways.
Installing temporary flooring in a leased property requires careful engineering. Direct adhesion onto older resilient flooring can cause strong chemical bonding over multi-year leases, making adhesive cleanup difficult during lease turnover. By adopting the painter tape barrier underlayment method, renters create an effective release boundary that facilitates clean extraction while maintaining a stable, durable walking surface throughout tenancy.
Table of Contents
Subfloor Feasibility and Pre-Installation Checks
Before unboxing tiles to install peel and stick floor tiles over rental linoleum, evaluate your subfloor condition:
- Subfloor Type Identification: Verify that your existing floor is smooth sheet linoleum, sheet vinyl, or fully glazed ceramic tile. Avoid installing peel-and-stick tiles over unsealed hardwood, raw plywood, or compromised subfloors.
- Surface Soundness: Check for loose edges, bubbling, or deep cracks in the underlying linoleum. Adhesive tiles conform to subfloor contours; depressions or curling edges can telegraph through flexible vinyl over time.
- Adhesion Patch Test: Apply a single tile or test strip of blue painter tape in a discreet closet corner. Inspect your test patch after approximately 24 hours to confirm dependable adhesion and clean release behavior.
- Moisture and Wax Inspection: Heavily waxed linoleum prevents adhesive bonding. Clean the test area thoroughly to strip commercial floor wax or grease films prior to laying tiles.
- Pre-1980 Asbestos Caution: Vintage 9-inch by 9-inch resilient tiles in older buildings may contain encapsulated asbestos and must never be sanded, scraped, or disturbed. Temporary barrier installations must sit undisturbed on intact substrates.
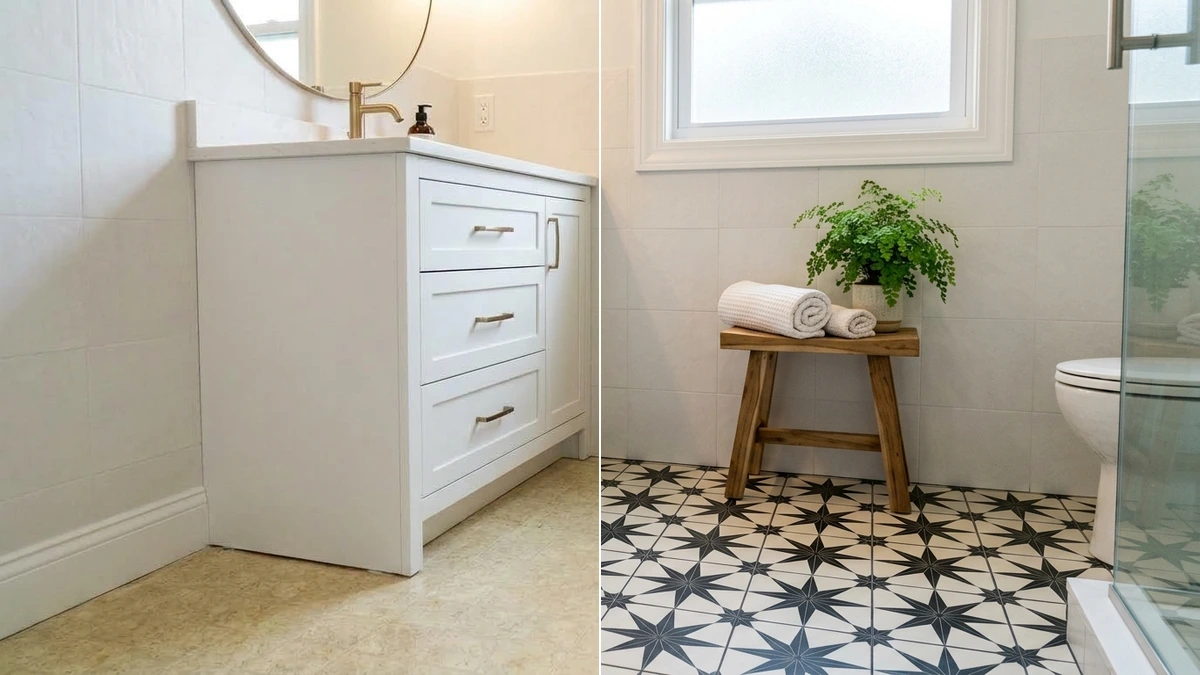
Rental Subfloor Compatibility and Installation Methods
Different rental subfloors present distinct challenges regarding adhesion, moisture protection, and end-of-lease removal:
| Method / Flooring Type | Subfloor Compatibility | Adhesion & Barrier Mechanics | Move-Out Removal Profile |
|---|---|---|---|
| Painter Tape Barrier Method (1.2 mm Virgin Vinyl) |
Smooth sheet linoleum, printed sheet vinyl, sealed flat surfaces | Medium-tack acrylic painter tape creates a sacrificial release layer between linoleum and tile adhesive | Gentle heat softening with a hair dryer; minimal residue cleaning with isopropyl alcohol |
| Direct Peel-and-Stick Tile (Virgin Vinyl 12″ x 12″ Tiles) |
Smooth factory-finished non-porous linoleum in short-term leases | Direct pressure-sensitive adhesive contact against resilient subfloor wear layer | Requires extensive heat softening and adhesive remover treatment; elevated risk of adhesive transfer |
| Floating Click-Lock Planks (Rigid Core Luxury Vinyl) |
Heavily embossed linoleum, tile with deep grout lines, uneven floors | Zero adhesive contact; interlocking mechanical edges float freely over existing floor | Complete dry removal with zero adhesive cleanup; mechanical separation |
Essential Tools and Materials for Temporary Floor Tiling
Gathering quality tools ensures crisp perimeter cuts, tight seams, and dependable adhesion across your floor layout:
- Peel-and-Stick Vinyl Floor Tiles: High-grade virgin vinyl tiles, such as FloorPops peel and stick floor tiles, feature a durable 1.2 mm caliper thickness and measure 12 inches by 12 inches per tile.
- Sacrificial Underlayment Tape: Multi-surface blue painter tape, typically in 1.88-inch or 2.83-inch widths, establishes a sacrificial underlayment barrier engineered for clean surface release.
- Degreasing Floor Cleaner: Neutral pH floor wash or mild dish soap solution to remove household grease and surface grime.
- Isopropyl Alcohol: Clean perimeter seams, typically using 70% isopropyl alcohol, to remove lingering oils without degrading linoleum coatings.
- Heavy-Duty Utility Knife: Fitted with fresh straight and hook blades for precise score-and-snap cutting.
- Rigid Metal Straightedge: Heavy steel ruler or carpenter square for guiding straight perimeter cuts.
- Weighted Seam Roller: Handheld seam roller or weighted vinyl floor roller to activate pressure-sensitive adhesive bonds.
- Template Paper: Heavy kraft paper or cardboard for drafting custom contour templates around curved plumbing obstacles.
- Removable Silicone Sealant: Waterproof silicone caulk for bathroom wet zones along tubs and toilets.
- Household Hair Dryer: Standard hair dryer for thermal softening during move-out tile extraction.
How to Install Peel and Stick Floor Tiles Over Rental Linoleum in 5 Steps
Follow this step-by-step method to install peel and stick floor tiles over rental linoleum with dependable alignment:
Step 1: Subfloor Cleaning, Degreasing, and Tape Barrier Grid
Thorough cleaning represents the foundation of successful tile adhesion. Sweep and vacuum the linoleum thoroughly, paying special attention to baseboard crevices where grit collects. Mop the entire floor with warm soapy water to strip surface grease and food oils. Rinse thoroughly with clean damp microfiber mops. Allow the clean subfloor to air-dry completely, typically for at least 2 hours, before laying your tape barrier.
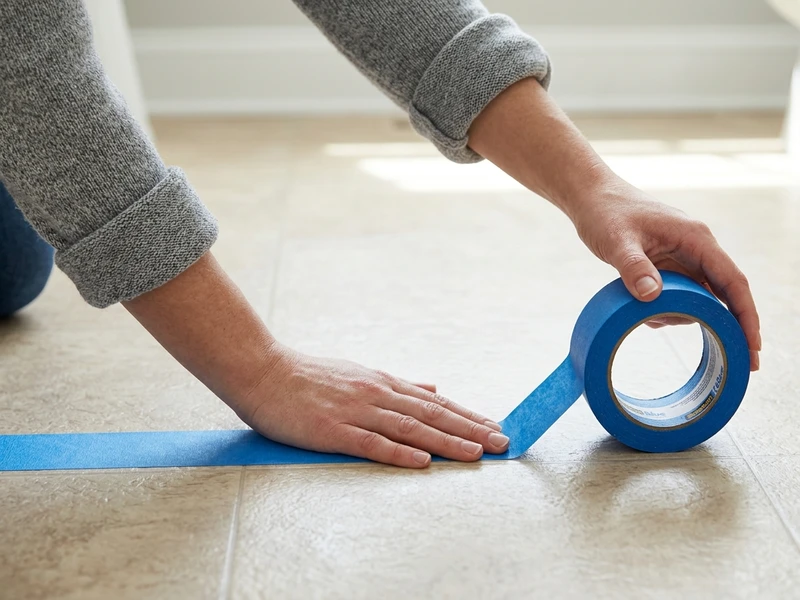
Using multi-surface blue painter tape, roll out continuous strips across the entire room floor. Align tape strips edge-to-edge with zero gaps and minimal overlap. Smooth each strip firmly against the floor using a plastic squeegee or clean rag to eliminate air bubbles.
Step 2: Snapping Perpendicular Centerlines
Avoid beginning tile placement against a crooked baseboard or room perimeter wall. Rental walls are rarely square, and starting along an outer wall produces asymmetrical, awkward tile slivers on opposing sides.
Measure the length and width of the room to calculate the exact geometric center. Snap intersecting perpendicular chalk lines across the room midpoint. Dry-fit a row of tiles along both chalk lines from the center toward the perimeter walls. If perimeter border cuts fall below 2 inches wide, shift your starting intersection point by around 6 inches to ensure wide, stable border tiles on all room perimeters.
Step 3: Peeling, Aligning, and Firm Pressure Rolling
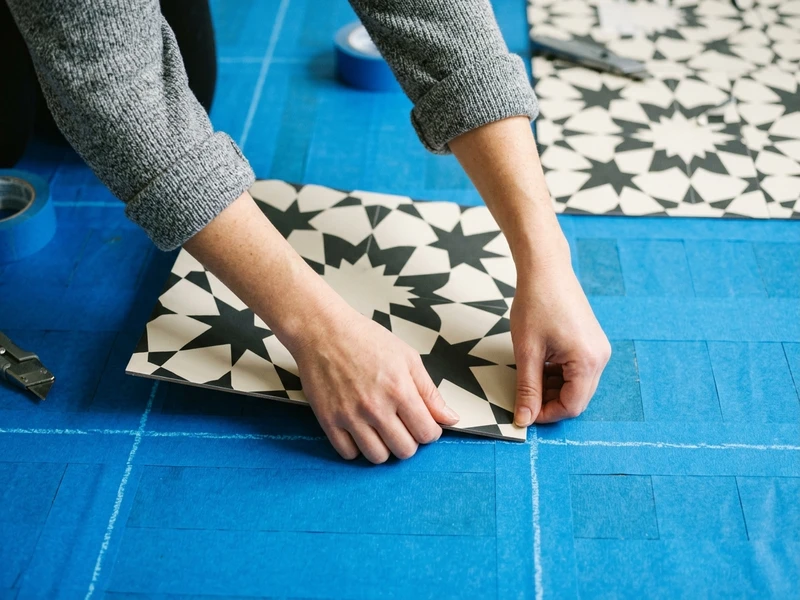
Commence installation at the central chalk intersection. Peel the protective backing paper from your first 12 inches by 12 inches tile. Align the tile edges strictly along the intersecting chalk reference lines, keeping edges butted snugly against adjoining tiles without forcing or overlapping.
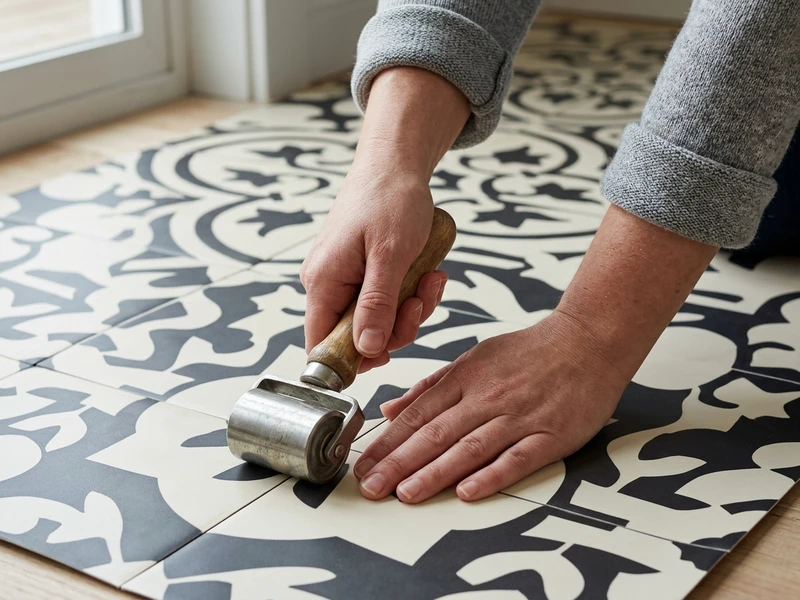
Pressure-sensitive acrylic adhesives require mechanical force to form a durable bond. Once a tile is positioned, run a weighted seam roller across the entire face, moving from the center outward toward the edges. This downward pressure forces out micro-air pockets and fully engages the adhesive matrix with the painter tape barrier.
Step 4: Scoring and Snapping Perimeter Cuts
When approaching baseboards, cabinet toe kicks, and doorways, straight perimeter cuts are required. Fortunately, 1.2 mm virgin vinyl floor tiles cut cleanly without power tools.
Place a loose tile directly over the last fully adhered whole tile. Place a second whole tile over it, sliding it flush against the wall or baseboard. Use the top tile edge as a straightedge to mark the cut line onto the tile underneath. Align a rigid steel straightedge along your pencil mark and firmly score the vinyl face using a sharp utility knife. Bend the tile downward along the score line; the virgin vinyl snaps with a clean edge. Maintain an intentional 1/16-inch to 1/8-inch perimeter expansion gap along all baseboards to accommodate seasonal room expansion.
Step 5: Cutting Complex Contours Around Fixtures
Bathrooms present curved toilet pedestals and radiator pipes that demand custom contours:
- Take a sheet of heavy kraft paper cut to 12 inches by 12 inches matching the tile dimensions.
- Position the paper against the plumbing obstacle and cut small radial relief slits approximately every 1/2 inch along curves to create an accurate template.
- Crease the paper along the contour profile and trace the line with a pencil.
- Cut out the template pattern, overlay it onto your vinyl tile face, and trace the contour line.
- Score carefully along the curve with a utility knife, test-fit the piece dry, and press it firmly into position.
Bathroom Wet Zone Sealing & Water Protection
In rental bathrooms, standing water from showers or splashes near vanity sinks poses a risk if allowed to seep beneath tile seams. Water pooling under temporary tiles can soften adhesive backing or foster hidden mold growth on the original linoleum.
To establish a moisture-resistant barrier, apply a continuous thin bead of clear removable silicone sealant along the bathtub apron, around the base of the toilet pedestal, and along exposed vanity toe kicks. Smooth the silicone bead with a caulking tool or gloved finger dampened with water. This flexible seal prevents surface water from migrating beneath tile edges while peeling away cleanly during move-out turnover.
Move-Out Removal: Safe Extraction Protocol
When your lease concludes, removing temporary vinyl tiles without damaging the underlying linoleum requires patience and thermal softening:
- Peel away any perimeter silicone sealant beads around tubs and toilet bases using a plastic putty knife.
- Set a household hair dryer to warm heat. Direct warm air from a hair dryer over a corner tile for approximately 10 to 15 seconds, then slowly peel the tile upward at a low 45-degree angle.
- If installed over a blue painter tape barrier, the tile and tape will frequently lift together as a cohesive unit. If sections of tape remain on the floor, lift an edge with your plastic scraper and peel back smoothly.
- Allow the isopropyl alcohol around 60 seconds of dwell time to soften any isolated adhesive remnants, then wipe clean with a microfiber cloth.
- Mop the entire floor with warm soapy water to clear residue traces, leaving the landlord original linoleum clean and inspected.
Frequently Asked Questions About Floor Tiles Over Linoleum
Will peel-and-stick floor tiles ruin the rental linoleum underneath?
Direct adhesive installation carries measurable risks of adhesive transfer and surface damage, particularly over aged or brittle linoleum. Establishing a sacrificial barrier of multi-surface blue painter tape between the linoleum and the vinyl tiles isolates the aggressive adhesive backing. Clean removal outcomes depend on subfloor condition, heat application during extraction, and following proper adhesive remover cleanup steps.
How do you remove stubborn adhesive residue left on the linoleum?
Stubborn adhesive remnants soften effectively when treated with rubbing alcohol. Apply the rubbing alcohol to a microfiber cloth, allow around 60 seconds of dwell time to soften adhesive binders, and gently lift the softened residue using a flexible plastic putty knife.
Can you mop peel-and-stick vinyl tiles in a rental bathroom?
Yes, peel-and-stick vinyl floor tiles can be damp mopped using a well-wrung microfiber mop and neutral, non-abrasive floor cleaner. However, you should avoid saturating the floor with standing puddles of water, as moisture can seep between unsealed tile seams and degrade the underlayment bond.
Why is an expansion gap required along room baseboards?
Virgin vinyl floor tiles expand and contract slightly in response to ambient indoor temperature and humidity fluctuations. Maintaining an intentional 1/16-inch to 1/8-inch perimeter expansion gap along all baseboards prevents tile edges from binding against walls, which could otherwise cause edge lifting or center buckling during warmer seasonal months.
